


I feed around 40 budgies every morning. That means refilling scattered dishes, wiping poop out of seed, and walking back and forth with bags while the whole flock screams for breakfast.
I wanted one hanging station in one spot: easy to refill in seconds, hard to poop in, with perches on all sides so birds can eat from every direction.
This is how I built it, what it cost, what I would change, and how the flock actually reacted. Plus the surprise I found while waiting — a baby budgie that should not exist, because I had swapped all real eggs for plastic dummy eggs.
Quick Summary If You Are Short On Time
- Project: hanging wooden feeder, multi-level, for ~40 budgies in an outdoor aviary
- Cost: ~€40, wood board is the most expensive part
- Materials: wood boards, wire for hanging, screws, pet-safe paint, jute rope for trim, 3D printed perches + 3D printed tree with cuttlebone holder
- Use: seed only, 4 dishes. That amount gets eaten clean in 24 hours with no waste
- Safety: wire, not chain. Screws, not hot glue. Seed feeder separate from water
- Flock reaction: scared on day 1, eating within 24 hours after one brave bird started. Morning + millet spray broke the fear
- Surprise: Nimbus, a young female, threw out dummy eggs, laid real eggs, hatched chicks
If you have 4-6 budgies indoors, you can build the same thing smaller. One level for seed, one level for water works fine for a small flock.
Aviary Life Before the Build: Heatwave, Shade and Morning Routine
I start around 6:00 AM. My budgies wake around 5:00 AM, and the rooster starts testing his voice around 4:00 AM.
We were in a record-long heatwave. For 2 months it rained only twice, and both times it was so short I would not even call it rain. Forecast said about 10 more days of heat before temperatures drop in September.
What kept the birds safe:
1. Shade. The shade cloth plus the closed section of the aviary did most of the work. Without shade, an outdoor aviary in this heat is not safe.
2. Fresh water everywhere. Changed daily, more than one station. Chickens drink a lot in heat too.
3. Baths, but on their terms. I put out a shallow bowl with clean water and let them decide. Some days they ignore it because it is too hot. Some birds take one or two splashes and leave. Never force a budgie to bathe.
4. Secure perimeter. No cats hanging around anymore, chickens stopped crossing the fence, and I am still watching for a marten trying to dig underneath. Once the aviary is secure from digging and jumping predators, daily work drops to food, water, treats, and watching them.
Side notes from that morning: the cockatiels in their new aviary were mostly sitting side by side, exploring a bit. Chickens were standing with wings spread to cool down. Egg laying drops in extreme heat — normal, not a disease.
Why I Built a Hanging Feeder Instead of Buying One
I could not find anything to buy that did what I wanted:
- one spot for all seed
- hanging, so I can move it anywhere in the aviary
- multiple levels for 40 birds to eat at once
- dishes I can lift out, wash, and replace in seconds
- no spot directly above for birds to perch and poop straight down into food
A hanging design also helps a little with poop. It does not prevent it — budgies will poop in food while flying over, walking through, or just because they are budgies — but it removes the worst case where a fixed dish sits permanently under a favorite perch.
Materials and Tools
You do not need expensive tools for this.
Wood: One solid board for the base levels, plus smaller planks for sides and dividers. The board was the most expensive part of the whole build.
For hanging: Steel wire. Not chain, not cotton rope, not yarn. Wire holds weight, does not fray into threads birds can swallow, and does not create loops toes can get stuck in.
I once saved a budgie at the last moment after he got tangled in a cotton toy. It looked harmless. That taught me to check everything I hang in the aviary as if a curious beak and foot will test it.
Fixings: Wood screws in different lengths. Hot glue only to cover screw heads under small ornamental caps — never as the main joint. Budgies chew hot glue joints apart. Screws hold.
Paint: Pet-safe paint. I used white and anthracite before, this time I took some color from my wife because summer deserves color. If the paint is not labeled safe for pets / birds, do not use it. Expect them to chew edges no matter what you use.
Trim: Jute rope around edges. It hides imperfect cuts and makes the whole thing look finished. Risk: budgies will shred jute. That is why everything under it is screwed. Treat jute as decoration, not structure.
Dishes: 4 removable plastic / stainless dishes for seed. Around 3 cm deep is ideal. Mine ended up a bit deeper. Because the feeder is long, birds climb inside and eat anyway, but shallow is better for less waste and easier cleaning.
3D printed parts: Perches in the same style as my nesting tower project, plus a decorative tree that doubles as a cuttlebone holder. Printed in PLA. ABS is tougher, but PLA held fine for this use. Expect chewing — this is not chew-proof.
Reused part: Old wooden shovel handle as side perches. Mila suggested it. It stiffens the whole structure and gives more landing space. Covered in jute for grip and looks.
Total cost landed around €40. Five years ago the same build would have been ~€10. Wood prices changed everything.
How I Built It – Step by Step
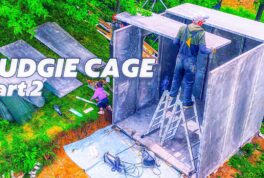
Step 1: Cut the base boards I clamped a second board on top as a straight guide for the handsaw. Simple trick if you do not have a table saw. Cut to length for two to three levels depending on flock size.
I forgot to cut one piece smaller. Did not matter — with extra planks it looked more styled. If you miscut, add trim instead of starting over. Hardware store is close for a reason.
Step 2: Build levels connected by wire Since this serves ~40 birds, single level is not enough. Levels are spaced so birds can land, hop between floors, and eat from all sides. Wire runs through to hang the whole stack from above. Later I will probably upgrade the connection, but screwed wire holds for now.
Step 3: Paint before assembly of details Paint boards and let dry fully before adding rope and perches. Two thin coats beat one thick coat. No fumes left by the time birds touch it.
Step 4: Add side perches from shovel handle Cut the old shovel handle to length, screw from inside, wrap with jute. This does two jobs: extra perching and structural bracing so the feeder does not twist when hanging.
Step 5: 3D print and fit perches I printed perches to match my nesting tower design, test-fit, adjusted, then screwed in. Idea was to make them from natural wood, but printed parts were faster to fit and smoother on feet than cheap dowels. Real natural branches from safe trees are still best for feet if you have them. Printed is second best for uniformity.
Step 6: Hide screw heads Small dab of hot glue + ornamental cover over each screw head. You can barely see them. This is cosmetic only. The screw underneath does the holding.
Step 7: Add-ons: swing + tree with cuttlebone holder I left space underneath for a swing later — turns a feeder into a playground. While editing I printed a small tree. It sits on top as decoration and holds cuttlebone properly instead of wiring cuttlebone to a perch, which always looks messy and breaks.
Step 8: Hang it where birds cannot perch above it Middle of the aviary looks nice for video but is not ideal. Best spot is to the side, with no beam or perch directly above. Even then, expect some poop. You cannot out-engineer 40 flying budgies.
I hung the tree part at night so they could see the silhouette before morning feeding. New objects are less scary if they appear overnight and are already there at sunrise.
Why Seed Only – No Water in This Feeder
I wanted one station for everything. With budgies it does not work:
- They are messy eaters. Seed husks end up in water in minutes if water sits under food.
- If you put water dishes on the sides, they perch on the rim and poop in.
- Wet seed molds fast in summer heat.
So: this feeder is seed only. Water and bathing dishes stay separate, low, easy to lift, wash, and refill. Next project will be a dedicated water station built the same way — easy access, easy clean.
If you have 4-6 birds indoors, you can use level one for water, level two for seed. Waste is manageable at that scale. At 40 birds outdoors in 35+ C, separation is mandatory.
How Much Seed for 40 Budgies?
Tested: 4 full dishes eaten clean in 24 hours.
More than that left leftovers. Less than that caused fighting and empty dishes by evening.
I use the same seed mix with many seeds plus some pellets mixed in. Leftovers go in one bag for compost — now the chickens eat them, and wild birds pick through what is left outside. Nothing wasted.
Celebration day I added millet spray on top. Whole flock swarmed within seconds. That tells you millet is a treat, not a base. Use it to introduce new things, reward, and train. Base diet stays balanced mix, plus vegetables, cuttlebone, and mineral block.
Dish depth note: aim ~3 cm deep. Deeper dishes trap old husks at the bottom and birds sit in food. Long shallow dishes stay cleaner.
How to Get Scared Budgies to Use a New Feeder
A tame single budgie at home tries a new feeder in two minutes. An aviary flock of 40 acts like the feeder is a predator.
One bird panics, all 40 panic. That is flock mentality. Gary, usually brave, was even cautious this time.
What works:
1. Introduce in the morning when hungry. Curiosity beats fear when crops are empty. Do not introduce at noon after they already ate.
2. Leave old food available at first, then let hunger do the work. I left the new feeder up and waited. Hand-feeding millet in the morning as usual helped — they were already in food mode.
3. You only need one brave bird. Once one eats, the rest follow in minutes. Always happens. Do not chase them toward it. Sit with camera, stay quiet, let them circle.
4. Place at night. Hanging it overnight means no scary installation noise in front of them. They wake up, see it already there, inspect from a distance.
Within a day they went from avoiding it to breakfast frenzy. Expect poop on day one. I noticed it, was surprised for 2 seconds, then remembered: they are budgies.
The Surprise Baby Budgie and Dummy Eggs
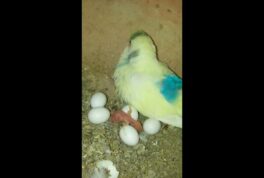
While waiting for them to try the feeder, I heard tiny chirps from a nest that should have been empty.
Background: to stop more breeding, I had swapped real eggs for plastic dummy eggs. Nimbus — a younger female — threw out all the fakes and laid real eggs again. Result: beautiful unexpected chicks.
If you use dummy eggs:
- Check nests. Some females reject fakes and re-lay.
- Count eggs. If fakes disappear and egg count changes, she is laying again.
- Young females can still lay. Age does not guarantee pause.
- If you truly need a breeding break, remove nest boxes / nesting opportunities, extend dark night to 12 hours, reduce fatty seed and warm soft food, and separate pairs. Dummy eggs alone do not always stop a determined hen.
I did not plan these chicks, but they are healthy and loud. I will leave them with parents, monitor weight and crop fill, and avoid disturbing the nest more than needed.
Maintenance: Cleaning, Chewing and Repairs
Assume they will try to destroy it. Because they will.
Daily: refill 4 dishes, shake off husks, quick look for poop in seed. In heat, check water twice.
Every few days: lift dishes out, wash, dry, refill. Wipe perches where droppings pile. Check wire tension — hanging shifts as birds land in groups.
Weekly: inspect edges for chewing, jute fraying, loose screws. Tighten screws. Trim frayed jute threads so toes do not tangle. Replace cuttlebone when thin.
What fails first: painted edges, jute wrap, PLA details. That is normal. Repair beats rebuilding. Keep spare screws, a short roll of wire, and leftover paint.
Do not use air freshener, scented cleaners, or spray paint near the aviary. Wash with hot water + vinegar, rinse well, dry in sun.
What I Would Do Differently Next Time
- Shallower dishes, ~3 cm, all four the same.
- Hang to the side from the start, not in the middle.
- More natural wood perches mixed with printed ones for foot health.
- Build the water station at the same time, same hanging style, separate location.
- Print two spare perches and one spare tree. When they chew one, swap in seconds instead of waiting for a print.
FAQ
How much does a DIY hanging budgie feeder cost? Mine was ~€40, mostly wood. Smaller indoor version for 2-4 budgies can be under €15 with scrap wood + 2 dishes.
What paint is safe for a bird feeder? Only paint labeled safe for pets / birds, fully cured before birds touch it. No spray fumes around birds. Expect chewing regardless.
Can I use chain or rope to hang it? I use wire. Chain links can trap toes and beaks. Cotton / yarn frays into threads that tangle feet and crops. If you use rope for looks, keep it wrapped tight over solid wood and screwed, and trim frays.
Why not put water in the same feeder? Budgies flick husks and poop into water fast. In outdoor heat, wet seed molds. Separate seed and water stations stay cleaner and are faster to service.
How many dishes for 40 budgies? 4 dishes was the sweet spot here — eaten clean in 24 hours with no waste. Scale down: 1 dish per 8-10 budgies is a practical start, then adjust.
Why are my budgies scared of a new feeder? Flock instinct. One scared bird triggers all. Introduce in the morning when hungry, place it overnight, sit quietly, and wait for the first bird to eat. The rest follow.
How deep should seed dishes be? Around 3 cm. Deep cups trap husks and invite sitting / pooping in food.
PLA or ABS for 3D printed perches? ABS is tougher. I used PLA and it worked for perches and the decorative tree + cuttlebone holder. Treat prints as replaceable — budgies chew everything.
Do plastic dummy eggs stop breeding? Sometimes. Determined hens like Nimbus throw them out and lay again. For a real break, also remove nests, give 12 hours dark, cut back on fatty / soft warm foods, and separate sexes if needed.
What seed mix do you use? A varied budgie mix with added pellets. Millet spray only as treat / training reward, plus veg, cuttlebone and mineral block always available.


Add comment