



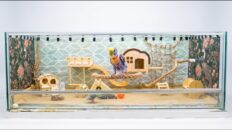
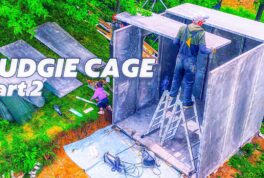
This is my third DIY budgie cage, and by far the biggest and hardest one I built. The first two were wood and wire. This one is wood and glass.
I wanted three things: more flying space, no seed mess all over the room, and a cage that is easy to clean every day. After a few weeks of work and testing with my own flock, this glass cage does all three.
In this article I will show you exactly how I did it, what dimensions I used, what to watch for with ventilation and glass, and who should NOT build this type of cage.
Watch the full build here: https://youtu.be/yzcUrbD46vk
Quick Specs
- Outside dimensions: 110 cm wide x 110 cm high x 64 cm deep
- Type: Wooden frame + glass panels with sliding front doors
- Birds it was built for: Tame, settled budgies used to people and indoor aviary life
- Cleaning system: Pull-out bottom tray
- Perches: Natural apple tree branches + recycled perches from old cage
- Build time in video: 13:40 full process condensed from several days of work
Read This Before You Build: 2 Safety Warnings
I put this at the top on purpose.
1. Glass is NOT for untamed or easily scared budgies. A tame budgie understands boundaries and learns where the glass is. An untamed, panicked budgie that thrashes around the cage can fly full speed into a clear panel and break its neck, beak or wing. If your birds are new, not hand-tamed, or get night frights often, do NOT build a full glass cage. Use a classic barred cage or a flight cage with wire front.
All my birds in this video were tame and calm in my bird room. I had zero injuries, but that is because the birds fit the setup.
2. Ventilation is non-negotiable. Glass / acrylic / plexiglass holds heat and humidity. Without enough openings, ammonia from droppings builds up and you get respiratory problems, fungal growth and overheating in summer.
My design uses:
- open mesh sections for constant airflow
- sliding doors that do not seal 100% airtight
- plan for extra ventilation holes in the back panel for summer
If you close all sides with glass, you built a greenhouse, not a cage. Don’t do that.
Why I Built a Glass Cage
After two wire cages I had the same two problems every budgie owner knows:
- Seed husks, millet dust and feathers ended up 2 meters around the cage every day.
- The cages were tall but narrow. Birds could climb, but not fly.
Glass solves the first problem almost completely. The lower glass panels stop 90% of the spill. Food stays inside.
The 110 x 110 cm size solves the second. That is enough for short flights from perch to perch, which is what keeps budgies fit indoors. Multiple birds can sit apart without fighting over one top perch.
It also looks cleaner in a living room. You see the birds, not bars.
Downsides you have to accept: glass is heavy, it must be cleaned for fingerprints, and you must plan ventilation from the start. You cannot drill it easily later.
Planning and Dimensions
I planned the cage around three things: the space in my room, the size of glass I could transport safely, and the pull-out tray.
Final size: 110 x 110 x 64 cm.
Why that size:
- 110 cm wide gives two flight lanes inside. Birds can pass each other.
- 110 cm high lets me put high perches for sleeping and low feeding area, so droppings do not fall in food.
- 64 cm deep is enough for branches and toys without blocking the flight path in front. Deeper would be hard to reach in for cleaning.
I drew the frame first on paper: four vertical corner posts, top and bottom rectangles, middle supports for the tray slot and door rails. Then I measured glass to fit INSIDE the frame openings, not outside. Always measure the opening after the frame is assembled. Wood moves 2-3 mm and glass does not.
Tip: decide door direction early. I went with sliding front glass doors because they do not swing out into the room and scare birds. You need double rails – one panel slides left, one slides right.
Materials I Used
This is what matches the build in the video. Buy untreated, bird-safe wood only. No MDF, no OSB, no pressure-treated wood.
For the frame and body:
- Pine / spruce square battens for frame – approx 4 x 4 cm
- Plywood for back panel and side fill panels where glass is not needed – 12-15 mm
- Plywood for bottom base and pull-out tray – 12 mm
- Clear glass, 4-5 mm thick, cut to size for front, sides and lower front. Have it cut and edge-polished at a glazier. Do not cut it yourself unless you do glass work.
- Wire mesh / welded aviary mesh for ventilation fields, galvanized after welding, mesh size max 12 x 12 mm for budgies
- U-profile / H-profile or wooden rails for sliding doors
- Small door handles / knobs for glass
Fixings and finish:
- Wood screws 3.5 x 40 mm and 4 x 50 mm
- Wood glue
- Water-based, child-safe acrylic paint, white. Must be fully cured and odorless before birds move in. I painted white for light and to see dirt easily.
- Sandpaper 120 and 180 grit
- Silicone – only aquarium-safe silicone if you must seal a joint near birds, and let it cure fully 7 days
Interior:
- Natural apple tree branches for perches, different diameters 1.5 – 2.5 cm
- Stainless steel screws and washers to mount branches through the walls
- Food and water dishes, mineral block, cuttlebone
- Toys and swings recycled from old cage
- Newspaper / paper sheets or beech wood chips for tray lining
I also recycled the feeder doors and some perches from my old cage. No need to throw away good parts.
Tools
- Circular saw or hand saw + miter box
- Drill / driver + wood drill bits + countersink
- Jigsaw for ventilation cutouts
- Sander or sanding block
- Measuring tape, square, level, pencil
- Clamps
- Glass suction cups for safe handling
- Paint roller + brush
- Vacuum for constant dust removal
Work outside or in a garage for cutting and painting. Never cut or paint next to birds.
Step-by-Step Build
1. Cut and assemble the wooden frame
I started with the corner posts and the top and bottom rectangles. This is the load-bearing skeleton. Everything else hangs on it.
Screw + glue every joint. Pre-drill to prevent splitting. Check with a square after each side – if the frame is out of square now, the glass will never fit later.
In the video at 01:44 you can see the bare frame standing. My budgies came to inspect it right away. Cute, but keep birds away from fresh sawdust.
Leave a 2 cm slot at the bottom front for the pull-out tray. Build side guides from thin battens so the tray slides straight.
2. Build the pull-out tray
The tray is a flat plywood box with low 5-6 cm sides. It must slide out from the front without lifting the whole cage.
Sand the inside smooth and paint it with two coats so droppings do not soak into wood. Line it with paper for daily changes. In the video at 03:30 and 08:46 you see how it slides – that gap saves me 10 minutes every morning.
Make the tray 5 mm narrower than the opening on each side. Wood swells with humidity.
3. Back panel and ventilation openings
I closed the back with plywood for stability and to give birds a sense of protection. Budgies do not like being exposed on all four sides.
Before fixing the back, I cut ventilation fields at the top. I covered them with mesh, stapled from inside and framed with thin battens so no sharp edge is exposed.
Rule I use: at least 15-20% of total wall surface should be open mesh, split between high and low. Warm air exits top, fresh air enters low. If you only vent the top, air stagnates at the bottom where droppings are.
This is the part I plan to upgrade in summer – more holes in the back panel. Heat builds fast behind glass.
4. Paint and let it cure
I painted the whole wooden frame white at 04:38 in the video.
Two thin coats, sand lightly between coats. Then – important – let it air out for at least 3-5 days in a ventilated room, until you smell nothing. Birds have extremely sensitive lungs. Fresh paint fumes can kill them. No birds in the room while painting.
5. Install glass panels and sliding doors
This starts around 06:10.
Fixed side and lower panels go in first. Seat them in a thin rubber strip or felt channel, not directly on hard wood. Glass needs a little cushion or it cracks when the house vibrates.
Front doors: two glass panels in parallel rails. Test the slide many times. At 07:06 in the video you see me sliding them – they must move with one finger, no jerking. If a door jams, a bird can escape while you force it.
Leave a 3-4 mm overlap where the two doors meet in the middle so there is no beak-wide gap. Add small knobs.
I left small ventilation gaps around the door frame on purpose. Do not silicone doors airtight.
Clean all glass with water + vinegar only. No glass cleaner with perfume before move-in.
6. Mount natural perches
Around 07:14 I mounted apple branches.
Why apple: it is safe for budgies, hard enough to trim nails naturally, and the irregular diameter exercises feet. Avoid cherry, plum, apricot, oak, yew – tannins or toxins. No branches sprayed with pesticides, no roadside trees.
Preparation I do:
- Scrub with brush and hot water
- Bake at 100-110 C for 1-1.5 hours to kill mites/mold, or pour boiling water over thick pieces
- Let dry fully, sand sharp nubs
- Mount at different heights, but no perch directly above food/water
Fix branches with a stainless screw from outside through the wall into the branch end, with a washer. They must not spin. A spinning perch causes foot sores and panic.
Place one high perch for sleeping, one mid-level for activity, and keep the center open for flight.
7. Recycle parts from the old cage
At 07:44 I pulled parts from the old cage – feeder doors, hooks, some perches.
This saves money and helps birds adjust because familiar objects smell like home. Disinfect everything with hot water and bird-safe disinfectant (F10 or white vinegar), rinse well, dry in sun.
Check old wire parts for rust. Rust goes in trash, not in the new cage.
8. Toys, feeders and layout
Around 10:14 I set up toys.
Do not overfill a new cage on day one. I used:
- 2 feeders – seed mix + pellets in separate dishes so birds can choose
- 1 water dispenser + 1 open water dish for first days until I confirm they drink from dispenser
- 1 swing
- 2-3 shredding toys
- cuttlebone + mineral block on side wall
Keep toys away from the flight lane. Budgies need a clear 60-70 cm straight line to flap.
9. Final safety check before move-in
I run this checklist every time:
- Run your finger along all mesh edges – no spikes?
- All screws countersunk, no tips sticking inside?
- Doors slide, no gap wider than 1 cm anywhere?
- Tray slides in/out without pinching?
- Paint fully dry, no smell?
- No silicone smell?
- Perches solid, do not rotate?
- Water and food reachable without flying through toys?
- Room temperature 20-24 C, no direct sun hitting glass all afternoon?
Only then birds move.
Moving Budgies to the New Cage
At 11:00 in the video I moved the flock from the old small cage.
Do it in daylight, calm, no rush:
- Set up food and water in the new cage first.
- Place the old cage door-to-door with the new sliding door, or carry tame birds by hand one by one. I did it by hand because my birds are hand-tame.
- Let them exit on their own. Do not chase them with a towel unless you must.
- Leave the old cage next to the new one for an hour with door open, so a scared bird can go back.
- Stay in the room first 30 minutes. Watch for glass bumping. Tap lightly on glass once to show the boundary. Tame birds learn in minutes.
My flock explored perches within minutes, then went to food. First droppings in the tray – success.
If a bird pants, sits puffed on the floor, or flies frantically into glass repeatedly, take it out back to the old cage. That bird is not a candidate for glass.
Cleaning and Daily Routine
This is where glass pays off.
Daily (5 min): pull tray, change paper, refill water, blow out seed husks from feeders. Wipe front glass fingerprints with damp microfiber.
Weekly (20 min): wash feeders and water dishes with hot water, scrub perches where droppings build, vacuum around tray rails, check mesh for feather dust clogging ventilation.
Monthly: take out toys, wash and rotate – only 2-3 toys at a time to keep novelty. Check screws, check door rails for seed blocking slide. Inspect branches – replace chewed-through ones.
Because the lower half is glass, bedding stays in. My floor around the cage went from sweeping twice a day to sweeping once every 2-3 days.
Never use scented cleaners, bleach spray near birds, or air fresheners to mask smell. If the cage smells, ventilation or cleaning frequency is the problem, not lack of perfume.
What I Would Do Differently
Honest notes after living with it:
- I would add 2 more round ventilation grills low on the back panel before summer. Top venting alone is not enough when room hits 28 C.
- I would make the tray 2 cm deeper. Budgies flick husks sideways and a slightly higher tray edge would hold even more.
- For a breeding setup I would NOT use this exact version – breeding females chew wood frame more and chicks need more grip surfaces. This is a pet / flight home, not a breeding box.
FAQ
Is a glass cage good for budgies? It can be, but only for tame, calm budgies with proper ventilation. Pros: no mess, great view, flight space. Cons: heavy, heat risk, collision risk for untamed birds. If your birds panic easily, choose wire.
How big should a DIY budgie cage be? For 2-4 budgies, aim minimum 100 cm wide for real flight. My build is 110 x 110 x 64 cm and houses a small flock comfortably with space to fly perch to perch. Bigger is always better than taller – width matters more than height.
How do you ventilate a glass bird cage? Leave at least 15-20% of wall area as mesh, split high and low for airflow. Never seal all sides. Add extra back vents for summer. If you see condensation on glass in the morning, you have too little ventilation.
What wood is safe for budgie perches? Apple, pear, willow, hazel, beech, eucalyptus (pesticide-free). I used apple branches. Avoid stone-fruit woods like cherry/plum/apricot, oak, yew, and any treated lumber.
Can budgies see glass? Not at first. They learn the boundary in a tame flock within minutes to hours. Put a small sticker or perch in front of panels for the first day as a visual cue, tap gently, and supervise. Do not put untamed birds in.
How do you clean a glass bird cage? Pull-out tray daily, water/vinegar for glass, hot water for dishes. No chemical glass cleaners around birds. White paint helps you spot dirt fast.
How much does it cost to build? Depends on glass prices in your country. Frame wood + plywood + mesh + custom-cut polished glass + rails and paint. Glass is 50-60% of the cost. Recycling feeders and perches from an old cage, like I did, saves a lot.
Final Thoughts
This was my hardest build, but also the one my birds use the most. They fly more, the room stays cleaner, and daily cleaning is faster because of the tray and sliding doors.
Build it only if your birds are ready for it and you can give them air. Measure twice, ventilate more than you think you need, and let paint cure fully.
If you build one, send me a photo in the comments of the video. I read all of them.



Add comment